Before understanding the Dial Bore Gauge, let us first understand what is a bore? A bore is defined as any kind of hole in an object and a gauge is used to measure the bore of that object. A Dial Bore Gauge is used to measure the bore or hole of these objects.
There are many kinds of bore gauges used for different applications such as beam bore gauge, telescope bore gauge, small hole gauge, and dial bore gauge. The Dial bore gauge is simple to use and widely used to measure the bore diameter of an object. A bore dial gauge measuring range is available from a minimum of 6mm diameter to a maximum of 450mm diameter.
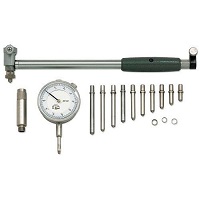
Parts of Dial Bore Gauge
A dial bore gauge consists of a measuring sled at the baseshaft with a dial indicator at the top. Apart from these, there are many other parts which are given below:
- Dial Indicator
- Bezel
- Knurled Holder Locking Screw
- Limit Hands
- Insulating Handle
- Satin Finish Gauge Stem
- Contact Shoes
- Interchangeable Fixed Anvil
- Moving anvil
Least Count of Dial Bore Gauge
| Size in mm | The least Count in mm |
| 6-10 | 0.01 / 0.001 |
| 10-18.5 | 0.01 / 0.001 |
| 18-35 | 0.01 / 0.001 |
| 35-60 | 0.01 / 0.001 |
| 50-160 | 0.01 / 0.001 |
| 160-250 | 0.01 / 0.001 |
| 250-400 | 0.01 / 0.001 |
How to Use a Dial Bore Gauge?
Before using the dial bore gauge, first, we need to do the zero point adjustment for accurate reading or measurement.
Dial Bore Gauge Zero Point Adjustment
- First of all, we need to prepare a ring gauge to use as a reference for setting the zero-point. Then, in this ring gauge, insert the Measurement Head.
- In cross-section perpendicular to the axis of the ring gauge, position the gauge along diameter.
- This is the maximum distance, and at this point, the Dial Indicator will read the minimum value.
- Then we have to position the indicator to minimize the distance.
- At that position, the Dial Indicator will read the maximum value. Then we need to move the indicator to position it and note the position where the Pointer shows the maximum value.
- The reading obtained at the above step is the zero-point.
- After that, we need to rotate the bezel of the dial bore gauge until the Pointer is at the zero point of the Indicator Face or coincides with each other.
Now we will understand how to read a Dial Bore Gauge
- Insert the dial bore gauge into the hole that is to be measured.
- Please ensure that both the anvils of the gauge should touch the wall.
- After that, gently move the bore gauge back and forth.
- The pointer will move either clockwise or anticlockwise direction.
- At some point, the pointer will start rotating in the revere direction. This can be on either side of the zero market value and indicates an oversize or undersized bore.
- Then, record this value and put the gauge out.
This is how you can read the dial bore gauge. Correct measurement is necessary, otherwise, wrong reading will not solve the purpose as the calculations might go wrong.
Maintenance of Dial Bore Gauge
- Keep all components of the Dial Bore Gauge clean and dry with a soft micro fiber cloth.
- Put all the items back in the case after use.
- Store in a temperature-controlled room.
- This is a precision instrument and it should not be dismantled for maintenance purposes.
- Keep the work area neat and clean.
If you have any doubt or clarification required, kindly comment down below.
Also, read about Micrometer
Frequently Asked Questions
What is the Least Count of Bore Gauge?
The least count of the Bore gauge is 0.01/0.001 mm.
What is Bore gauge?
A Bore Gauge is used to measure the bore or hole of these objects. more precisely. It is mostly used in engine cylinders to measure the bore or hole diameter.
What is Gauge and Bore?
A gauge is a device used to measure the value with respect to the reference value and a bore is a hole in an object. A gauge is used to measure the hole of that object.